Wednesday, May 27, 2015

The Pumpkin Dress - Florence, 1520

After four years in the DFW area, we finally made it down to The Scarborough Renaissance Faire in Waxahachie this year... and we did it in style!

Thank you for the picture, Andrea!

I knew it was going to be hot, but convinced that I would be happier going in garb, I decided to see what I could do with what I had on hand. I had some orange linen blend fabric left over from Mom's Age of Exploration unit, and some white muslin left over from another previous project. 

And the underdress? Well, if it's not quite right for the picture, then I'm not terribly concerned. You can't see much of the underdress in the paining for one, and then... well, it was the absolute first complete piece of SCA garb I ever made, sewn entirely by hand back in 2001. I'm just stoked it's survived this long - and that I can still wear it! I freshened it up with some new ribbon for the drawstring neckline and sleeves, and it was good to go!

In the end, I created a lovely linen dress from a measly three yards of linen, scrap muslin, and the three purchases I did have to make: 1/4 yard of black linen (for the big stripe and sash), 1 spool of linen weaving thread for weaving the thin stripe and top-stitching, and the black ribbon for lacing it up the back. 

Before the ball got rolling, I started clicking around on Pinterest to get some ideas, and my eyeballs screeched to a stop when I landed on this painting labeled, "Detail from Francesco Bacchiacca's Preaching of Saint John the Baptist, approx. 1520."

I Googled around, and discovered that it was supposed to be a Florentine design. Well, that cinched it. I adored the time Jake and I spent in Florence, and the idea that my dress design lived there hundreds of years ago was just too cool to pass up.


I allowed myself to get a little impatient with this project, and instead of following a pattern in greater detail, I just based the cut off another dress. I wish I had spent a little more time on it now, as the shoulders don't match the painting very well.
All the construction was done by hand, so turning it right side out at last was a treat. I do prefer flat construction whenever possible (remember my key-hole necklines and gore inserts?) and doing it this way allowed me to get a lot of precision in the cut of my wider black band around the neckline.
Finally, it came time to sew the straps together. I pulled one inside the other - wrong side out - and then matched up the black stripes as best as I could. There was a little adjustment to be made, but overall it went swimmingly!

After I connected the straps, I tackled the skirt section. I wanted to keep the two pieces apart as long as possible in order to reduce extra wear and handling. In this picture you can see the un-dyed linen thread I used to backstitch the seams. For the top-stitching, well, I went insane. I tried pulling threads from the edges of the fabric and using them for a perfect thread match. The idea is quite period, and maybe if this had been full linen instead of a linen blend I might have been more successful at it. As it was, many many... words of not-so-polite encouragement were hurled as the thread broke again... and again... and again. I managed to finish the back seam (the only one actually on the skirt) but then said "screw that!" and did the hem with some of my linen weaving thread.

In this picture, I'm pinning together the bodice and skirt sections. After the whole pulled thread fiasco, I felt the need for order. A lot of order. Guess my sign: Virgo!

Here you see the two sections combined, with the bodice's lining tucking away all the raw bits.

In the last picture, you saw the top of the back seam. Here's the bottom, with the hem. While it was a frustrating bit of business, I'm happy that it turned out so cleanly.

Once the two sections were together, it was time to add the narrow black band. The black linen fabric wasn't cooperating, so I got out my loom, rigid heddle, and black linen weaving thread to make my own. Not my favorite project, as it's hard to tell the threads apart, but it got the job done.

Finally, it was time for the eyelets. Not my favorite part, but hand-sewing them is much more period than the metal grommets you see so ubiquitously. At least it gave me a chance to use the bone awl I picked up in the outdoor market in Bologna!

Here's the back of the completed dress, with the underdress underneath. I ended up combining my favorite elements of the two main orange dresses, but I really like the black sash with it. Eventually I may try to figure out the tassels, but for right now it's working just fine.

Here's a better view of the dress. I love it!


At some point I may the black stripe around the bottom, but for right now it's a wonderful, wearable piece that makes me feel pretty!

Works Referenced:


Please note that this was intended as a heat-influenced homage and not an actual documentable piece. I did apply my knowledge of stitching types and lacing eyelets, but this owes too much to modern influences to be anything but that. Both the underdress and the overdress originated with commercial patterns.

Arnold, Janet. Patterns of Fashion: The Cut and Construction of Clothes for Men and Women c. 1560-1620. McMillan London Limited, Hong Kong: 1989. Figures 128, 137, 163, 163 and 164. (For eyelet/lacing details)

Crowfoot, Elisabeth, Frances Pritchard, and Kay Staniland. "Sewing Techniques and Tailoring." Museum of London: Textiles and Clothing c1150-1450. The Boydell Press, Woodbridge: 2002. Page 150-164.

Sunday, August 24, 2014

Mom's Age of Exploration Unit: Apron Dress Retrofit


What happens to your old garb? 

Think about the early sewing projects that make you wince when you look at them now. How about the pieces that just don't fit right... they could be a little too short, or bind too much around a slightly rounder belly than you'd like to draw attention to.

Their lives don't have to be over. 

I've made a summer project of updating, retro-fitting, and/or completely re-making my garb using what I've had on hand. There's been a lot of seam ripping, dyeing, some creating piecing, and other quick fixes which have breathed new life into my family's SCAdian wardrobes. 

I had no idea how wasteful I'd been before this. I had two totes of garb that just didn't work for us anymore, and I guess I just forgot the lessons I learned at Theatre UAF, ripping seams, removing and reapplying dye. I'm glad I finally wised up. 

It started with my husband's fighting tunic. His favorite tunic contains a color combination I'm really not fond of, which means he can feel free to do whatever he wants to it without me really caring about damage.

He attended several fighter's practices without me, so it wasn't until later that I realized the tunic's short sleeves were leaving big parts of his arms exposed, his neckline was too wide, and that the overall length was just too short to cover much of anything once he had a kidney belt binding it up. 

I swiped it from him, tossed it in the wash, and ripped out the hems. I had a few scraps of the rust colored main fabric left, so I used them to lengthen the arms. There was not enough of it to lengthen the overall tunic, so I pulled out some of the leftover contrasting teal linen and added a wide strip of it to the bottom. 

While those changes only took me a couple hours, they dramatically improved the usefulness of the tunic. It was a major "ah-ha!" moment for me, and after that I looked at my old projects in new light.

When Mom asked me for my help costuming three ladies in male and female Viking garb for her Age of Exploration unit, I knew I'd be diving again into those old projects. Some of the pieces were in good enough shape to go her way immediately, but my teal wool apron dress had some strap issues that needed to be addressed. 

As you can see, the straps on these apron dresses pre-date my more detailed research. Now that's not a major issue, but as much as I'm in love with the wool of this dress, the straps have always been too long for a good fit, and they also roll up in ugly ways. 

Seam ripper to the rescue! I removed the straps and ripped out all their stitching. I used every scrap of this fabric making this dress, so I had to cut the strap fabric in half longways in order to make long enough shoulder loops.

After the straps were fixed, I decided to add a little more pizazz to the dress by tablet weaving some gorgeous silk. I'd had the black silk on hand for years, and it was only recently that I was able to find a lighter contrast of the same silk: Gudebrod Bros, Size F. The Etsy seller was even nice enough to tuck in an extra spool for me to play with!

Here's the design I used, based on the chevron pattern in Schweitzer's “Beginning Tablet Weaving” handout. It took 14 cards, with a simple four forward, four backward motion.
One of the things I like about tablet weaving is that it makes it easier to try out quick tricks like this: Looping the thread over the bar on one side so I don't have to tie a knot there. My pattern only uses even numbers of each color, so it works perfectly! 

Also, to avoid the knot getting in the way on the other side, I divide my threads into quarters. The left top and bottom sections are tied together over the bar and pushed to the left, while I mirror the same on the right. Then, as I weave, I just wind the finished band in between the two knots. No more fighting to keep it from messing up my tension!

After that, all that was left was to attach the trim to the top of the apron dress. I am completely and totally in love with this! The pale green color looks more like a cream in contrast, and once it was sewn down on both sides it just made the garment come alive.

And, finally, we have the result. When you compare this to what it looked like initially, it is so much better! With the weaving, this update took about ten to twelve hours of work, but it also rescued a project that had been relegated to the old garb hoard and made it fresh and fabulous!


There are other projects in the hoard that need attention, so I will be continuing to go back through it and rescue/update what I can. Stay tuned!


Bibliography:


Baker, Jennifer. "Stitches and Seam Techniques Seen on Dark Age/Medieval Garments in Various Museum Collections." 2009. <http://nvg.org.au/documents/other/stitches.pdf> 11 June 2014.

Ewing, Thor. Viking Clothing. Gloucestershire: Tempus Publishing, Inc. 2006.

Glæsel, Nille. Viking Dress Garment Clothing. CreateSpace Independent Publishing Platform. 2010.

Hägg, Inga. "Viking Women's Dress at Birka: A Reconstruction by Archeological Methods." Cloth and Clothing in Medieval Europe: Essays in Memory of Professor E.M. Carus-Wilson. Ed. N. B. Harte and K. G. Ponting. Pasold Studies in Textile History. 1983.

Schweitzer, Robert. “Beginning Tablet Weaving.” Forward into the Past. 2 April 2011. <http://www.fitp.ca/articles/FITPXXI/beginning_tablet_weaving.pdf>
Geijer, Agnes. "The Textile Finds from Birka." Cloth and Clothing in Medieval Europe: Essays in Memory of Professor E.M. Carus-Wilson. Ed. N. B. Harte and K. G. Ponting. Pasold Studies in Textile History. 1983.

Thunem, Hilde. "Viking Women: Apron Dress." 25 February 2015. <http://urd.priv.no/viking/smokkr.html>

Saturday, August 16, 2014

Steppes Artisan Competition 2014


Today I attended my first Steppes Artisan competition, and I was completely overwhelmed by the awesomeness. From metalwork and stonework, embroidery and calligraphy to weaving and more edible arts, it was a fascinating and inspiring collection of arts and crafts from ages past. I was delighted to be a part of it.

For those of you who couldn't make it, here's a quick view of my table, as well as links to the relevant blog posts and documentation.

The right side of the table dealt mostly with my rigid heddle weaving. I've posted pictures of a couple bands at a time, but there's something special about seeing so many of them together.... especially since I only started weaving last January! I did pull out the family inkle loom, but only so I could demonstrate both a rigid heddle project and a tablet-weaving project at the same time.
The left of the table was my duct-tape model of Mom wearing my last two sewing projects: Her tunic and my new apron dress. Both were sewn entirely by hand using period stitching techniques. Here are links to more in-depth articles about each: Apron Dress: Part I, Apron Dress: Part II, and Mom's Under Tunic.
The middle of the table focused on my tablet weaving. I've mentioned before that my first two projects were completed within 24 hours of getting my cards! There are two relevant blog posts for these projects: Weaving with Period Fibres/Beginning Tablet Weaving and Tablet Weaving with Silk.

All I expected going into this event was some constructive criticism and maybe an "atta girl" or two. Instead, I had the honor of being recognized by Mistress Rhiannon, who gave me an awesome basket of goodies to play with. Other members of the populace were incredibly generous too, and I have a lot more beads and period toys to play with!


But what incredibly floored me was  receiving my first award in over a decade: The Sable Thistle in Weaving. While I received other honors during my time in the Kingdom of the West, this is my very first scroll! It's totally getting framed and hung in a place of honor!


One last note: If you enjoyed the mini chicken pies we brought for the potluck, the recipe was Capon Pie from MedievalCookery.com and is supposed to date to the 16th century Netherlands.

Thursday, August 14, 2014

Mom's Age of Exploration Unit: Viking Under Tunic


Sometimes learning history can be a bit of a drag, but in my mother's classroom it is a fantastic journey of discovery. For her upcoming unit on the Age of Exploration, she has asked me to help her costume herself and two of her peers in Viking garb. I already made her clothing for a Viking lady, but she wants her kiddos to see the male version as well, so a little gender-bending is in order!

I decided to start with the under tunic, mostly because it's been a tight summer and I had the fabric on hand. Well, most of it. I had to do a tiny bit of piecing at the back, but it worked perfectly!

For the design, I decided to go with what Marc Carlson describes as Nockert, Type 1. This style is very well represented, and I saw either identical or very close versions on Þóra Sharptooth's site, as well as in Nille Glæsel's book and on the Hurstwic site. Some versions include the front gores, while others leave them out. I decided to include them, for ease of motion and wear. I've seen (and made) a lot of tunics with only side gores, and they have a tendency to pull a little too tightly over the tummy.

When I moved on to the construction, I decided to pull out all the stops. I referred back to Jennifer Baker's wonderful stitching type handout and decided to use a (possibly overkill) backstitch to join the pieces, with a flat fell finish. I also used my favorite hem-stitch, although some of my hems were so small that they actually became rolled hems. As an additional step towards authenticity, I decided to actually do all the stitching with a linen thread. I usually go straight for Guterman's Heavy Duty threads, because both my husband and I are very hard on garments, but since this is for classroom use I did finally pull out the spool of linen thread I've been hoarding for the better part of a decade!

Finally, I decided to add tablet-woven trim to the neckline. In men's garments, this seems like it would be more of an outerwear feature, but I justified it with the thought that Mom will also be using this tunic for her female garb as well, where the length of the under tunic will be hidden.

Here's an image of backstitch in action. I love how much stronger it is than a simple running stitch. I've received comments before on how I'm doing modern over-kill here, but it is a documented stitching type, and if I was a real Viking lady, I'd rather do it right the first time than have to keep re-sewing the same seam when it breaks.
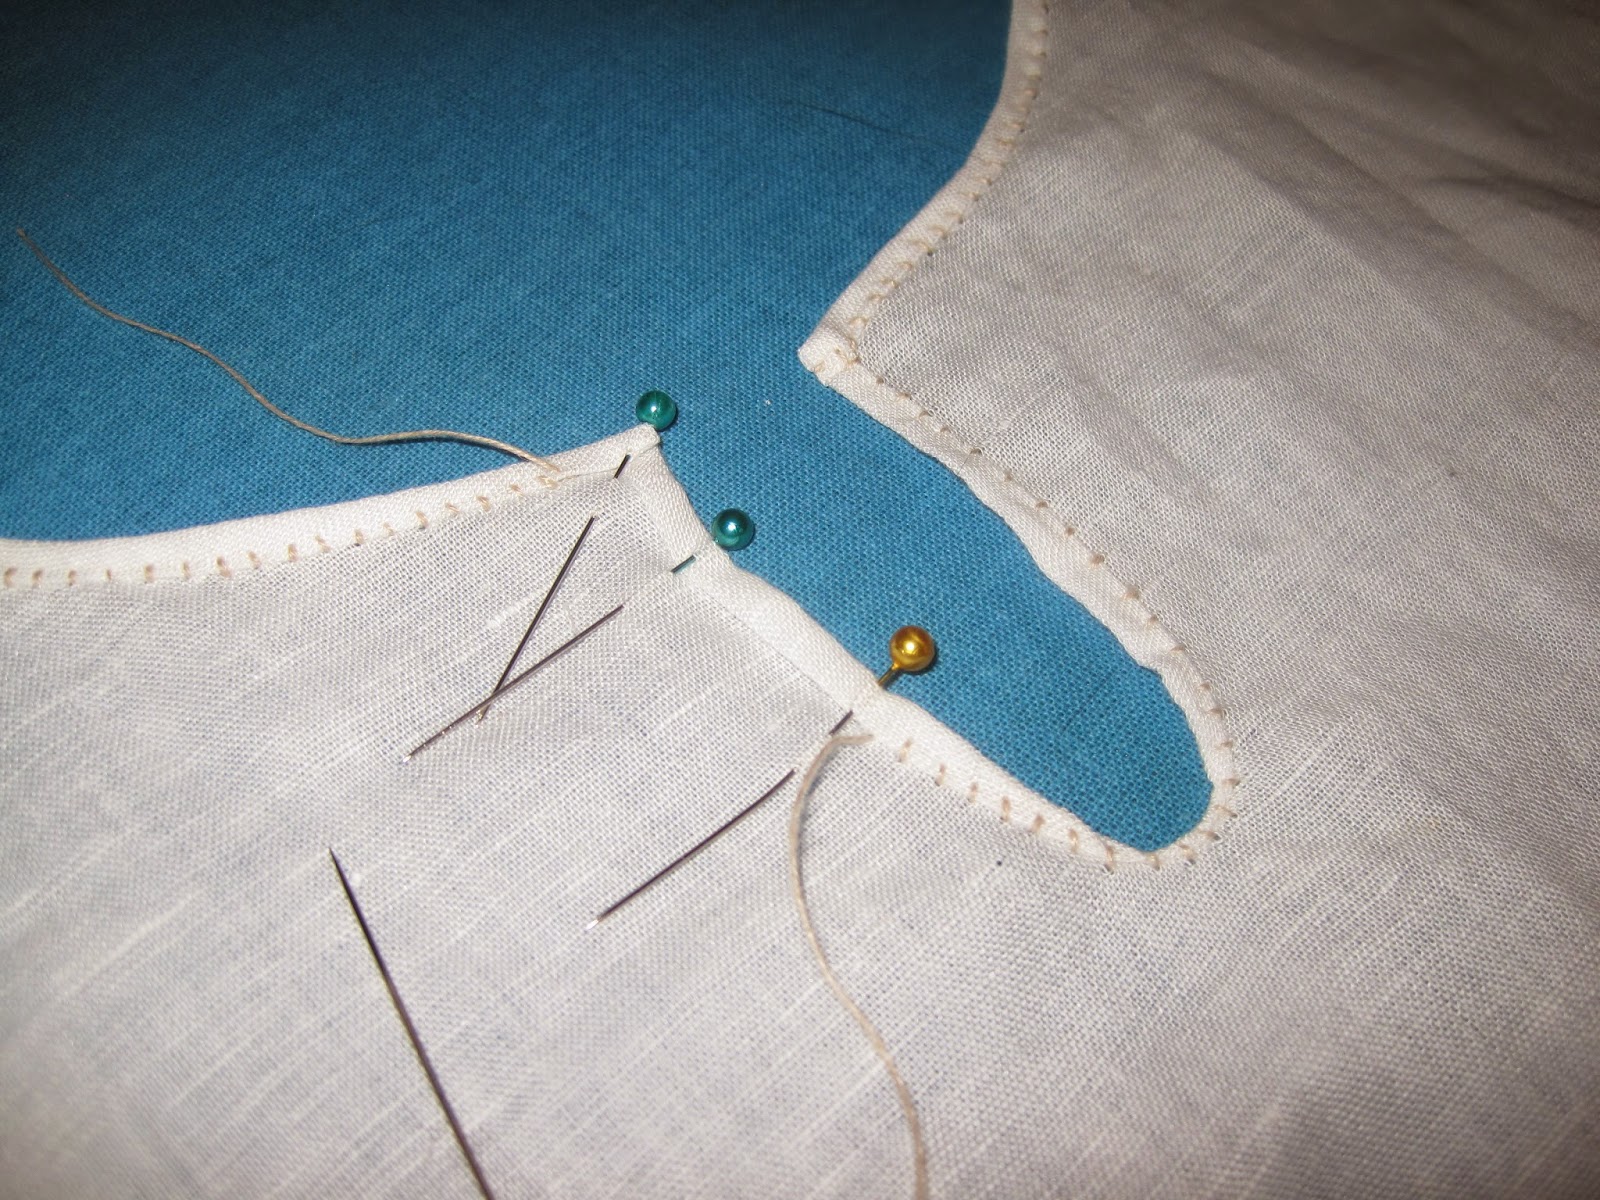
My secret for good necklines is to sew them flat. I always make sure to finish them before I sew up the sides, and they are so much easier that way! This actually became more of a rolled hem than a straightforward hem stitch, but the extreme narrowness is actually more period. Don't want to waste precious fabric!
In this view, you can see the garment laid out, with only the front and back gores missing. I will usually do those last, because otherwise it can get a little overwhelming to work with the entire thing open at once.
More backstitch, with a hint of my workspace/ironing board. In an apartment as small as ours, it meets my crafting needs perfectly!
This image was taken while I was finishing the side seam. You can see some of my tools of the trade. I had no idea when I started how important the beeswax would be while I was working with the linen thread. It has a tendency to felt and knot, but an occasional swipe with the beeswax makes a huge difference!
Here's a view of the underarm gore. Once I started sewing the gores open, there was no going back! The overlap both strengthens the seam and allows me to neatly finish the other seams as well. I still don't like them, but now at least it's not outright hatred!
And now we get to the tablet-woven trim. I can't believe I've only been rigid heddle weaving since January, and tablet weaving for the last couple weeks! For the trim on this tunic, I wanted a very fine, narrow band. After my experiment with silk thread, I decided to actually weave with my linen thread. It took three colors, but I am in love with the results!
And, finally, the completed garment on my duct-tape mini-Mom! Really, for all the costuming I've been doing for her, the duct-tape form has been a huge help.
All in all, I'm pretty proud of this project. It brings together a lot of the skills I've been learning and refining this summer, and without that additional study I wouldn't have been able to create something so authentic. 

Finally, I'm going to leave you with an image of this tunic with the hand sewn apron dress I completed just before this project. They may be different sizes, but together they demonstrate a pretty productive summer in terms of my costuming skills.


As always, I would love to hear your thoughts, so please don't hesitate to comment. Thank you!

Bibliography:


Baker, Jennifer. "Stitches and Seam Techniques Seen on Dark Age/Medieval Garments in Various Museum Collections." 2009. <http://nvg.org.au/documents/other/stitches.pdf> 11 June 2014.

Carlson, I. Marc. Some Clothes of the Middle Ages: Kyrtles/Cotes/Tunics/Gowns. 2003. <http://www.personal.utulsa.edu/~marc-carlson/cloth/tunics.html> 14 August 2014.

Ewing, Thor. Viking Clothing. Gloucestershire: Tempus Publishing, Inc. 2006.

Glæsel, Nille. Viking Dress Garment Clothing. CreateSpace Independent Publishing Platform. 2010.

Østergård, Else. Woven into the Earth: Textile Finds from North Greenland. Denmark: Aarhus University Press. 2004.

Priest-Dorman, Carolyn. "Viking Tunic Construction." Þóra Sharptooth's Resources for the Re-enactor. 1997. <http://www.cs.vassar.edu/~capriest/viktunic.html> 5 January 2014.

Short, William R. "Clothing in the Viking Age." Hustwic. 2014. <http://www.hurstwic.org/history/articles/daily_living/text/clothing.htm> 14 August 2014.

Wednesday, July 30, 2014

Tablet Weaving with Silk

Since I wasn't entirely happy with my last tablet weaving project, in linen, I got a wild hair and decided to try weaving with silk. Unfortunately, all I had on hand was silk thread, so what started off as a lark suddenly became the smallest, finest weave I've ever done.

Seriously, it's tiny!

I followed the same pattern as last time, so that it would be a more direct comparison based on fabric content. The final result is 3/16" (3mm) wide and 38-1/2" long. Just enough for a fabulous addition to a neckline!

Another reason it's so short is that I didn't want to go whole hog, because I wasn't sure how well it would work... and I wasn't sure how far my silk supply would go!


Here's the band with the three silks I used to create it. The wooden spool of green silk was almost exhausted, while the white spool just kept going and going - I'm surprised at how much it holds. Jake picked two of them up for me while we were in Milan.


For comparison's sake, here's the silk band with a penny.
And, finally, the progression of my tablet-weaving. From the left, my first project in 3/2 pearle cotton, my second project in linen, and my third in silk.


While it did take an obscenely long time to weave it this finely, I did really love working with the silk. It also held up better than cotton and linen to the wear and tear of the moving cards, and the slickness of the fibers made it much easier to work out the subsequent knots.

Moving forward, I may play my hand at dyeing some of the remaining white silk thread I have on hand... and some larger weaving silks are totally going on my wish list!


Bibliography:


Ewing, Thor. Viking Clothing. Gloucestershire: Tempus Publishing, Inc. 2006.

Glæsel, Nille. Viking Dress Garment Clothing. CreateSpace Independent Publishing Platform. 2010.

Schweitzer, Robert. “Beginning Tablet Weaving.” Forward into the Past. 2 April 2011. <http://www.fitp.ca/articles/FITPXXI/beginning_tablet_weaving.pdf>

Sunday, July 20, 2014

Tablet Weaving... Also Known as Tablet Heaving


I like order. There! I admit it!

I took to rigid heddle weaving like a duck to water because it's so damn orderly. Everything perfectly in its place. There's a beauty to that.

But eventually, if you're going to leave your comfortable nest and stretch your wings into greater authenticity, things will get messy.

That's what my first attempt at tablet weaving has been. Messy. Now, I kept it as gloriously ordered as I could, but in the end I did spend some time screaming verbal... let's call it encouragement... at a rather stubborn section that did not want to cooperate.

Okay, I may have had to seriously restrain myself from heaving it out a window.


But I didn't start there. I actually started moving towards greater authenticity in my trim weaving by going to the local weaving store: White Rock Weaving. I wasn't sure what sizes/types I'd need, so I relied heavily on the staff recommendations. In addition to some 5/2 pearle cotton I wanted to play with, I bought three ounces of Hammersmith 100% virgin wool and two kinds of 100% flax linen by a brand called Fibra Natura.


Rigid Heddle Weaving with Wool


The first new fibre to test out was wool. To sum it up in three words: It breaks. Often.

It's possible that this was just a problem because of the specific wool type, but every foot or so the weft would break on me. That's not horrible, but when one of the warp threads actually broke I was more than a little verbally abusive to it. In the future, I'll try to get a more finely spun wool... if that's possible.


Dyeing and Rigid Heddle Weaving with Linen


After the frustration of the wool came the relief of the linen. As I mentioned in my last blog post, I wasn't able to get my hands on a natural blue dye. RIT to the rescue!
For another length of my white linen, I decided to try one of the natural dyes from the dyeing workshop I attended last January at Runs with Scissors, Plays with Fire.

I took a couple tablespoons of Jake's turmeric and put them into two disposable tea filters. I didn't want the actual spice to get out and gunk up my yarn, and I was very pleasantly surprised that they worked so well.
The weaving store only had a small selection of colors - I didn't realize that the blue I dyed (the remnant is shown in the middle of the wooden spool) was nearly the exact same color as the company's Regata (#103)!

The turmeric yellow is shown here on the end of the wooden spool, and is so bright it's nearly neon!

And, finally, here are the three lengths I've woven with a rigid heddle. The left two are what remains after I finished my last apron dress project. The turmeric-dyed yellow and white looks like an albino python!

I thought there would be a little more contrast between the two, but if I remember correctly, turmeric is one of those dyes that fades with light exposure.


Card/Tablet Weaving with Cotton and Linen


And, finally, we come to the pieces I wove today as I experimented with tablet weaving. The pattern I used came from "Forward Into the Past: Beginning Tablet Weaving."

The green and white piece came first, while I figured out how to set up the loom and move the cards. I chose a 3/2 pearle cotton because I'm trying to phase it out of my collection. I've been really gravitating towards the finer yarns lately, so I figured it would do well for a potentially throw-away piece.

The design I chose was a repeating chevron pattern that used six cards at a time, for a total number of 24 threads. I cut them to only two yards, because that length allows me to get a feel for a project but isn't long enough to feel terribly wasteful if things don't go terribly well.

I learned a lot of things from this project: 1) How the threads at the end will wrap around each other as you weave, 2) That as cool as the diamonds are, the "X" designs are just as necessary, and 3) Counting things is very, very important.

I tried to put those lessons to their best use with the blue and white piece. Instead of letting my design go straight to the edge, I added a single color card to both sides. I was also very careful to count the numbers of chevrons between each element, in order to keep things balanced, even, and not to wound up at the back.

Since I figured this piece would eventually be attached to a neckline, I decided to go ahead and make it like I meant it: Enough length to be used in a garment and with an authentic fibre content. I decided to go with the linen.

I had no idea at all what I was in for. In case you don't know, the movement of the turning cards is a whole heck of a lot more intense on your threads than a nice, simple rigid heddle. I generated a small flurry with all the linen fibers coming off this project! Let's just say it's not good for those of us with allergies and leave it there.

When I switched from 3/2 pearle cotton to linen, I was expecting a much thinner profile. With all the threads turning and moving through the project, the band itself is about twice as thick as what I'd make on a rigid heddle. I figured the thinner fibers of the linen would keep it a little less bulky, but it' still pretty thick. I think I'll have to find an even finer linen if I'm going to make something that can go around the neckline of an undertunic or underdress.

But that being said, I'm still pretty proud of myself. I taught myself how to do a simple tablet-weaving pattern - and completed two small projects - less than 24 hours after receiving my cards in the mail!

The last project I did used a period method, with period fibres, and period colors. It's the most authentic trim I've ever made, and while it was incredibly frustrating at times, I do look forward to making garb that is even more authentic.

I still love my rigid heddle, and while I am not going to be putting it aside, I do see myself adding projects like this one to my future queue... especially with Steppes Artisan coming up!


Bibliography:


Ewing, Thor. Viking Clothing. Gloucestershire: Tempus Publishing, Inc. 2006.

Glæsel, Nille. Viking Dress Garment Clothing. CreateSpace Independent Publishing Platform. 2010.

Schweitzer, Robert. “Beginning Tablet Weaving.” Forward into the Past. 2 April 2011. <http://www.fitp.ca/articles/FITPXXI/beginning_tablet_weaving.pdf>