 |
| Extant Cap at the Museum of York in England |
When I was initially getting into Viking costume, I remembered seeing an extant cap when I was studying abroad in London. I had taken the train to York for the weekend to see the Jorvik Viking Museum and be-bopped into a couple other museums along the way. An email to the museum resulted in a reply with these specifications:
"Viking cap, tabby weave. Simple hood-shaped cap, fashioned from a single rectangle of plain-woven, hand-spun, undyed silk, shaped by a centre-back seam, which ran on the straight grain for [approximately] 17.5cm from the lower (neck) edge, curved over the back of the head and terminated as a flattened tapering dart, the point of the dart being approximately 5cm from the face-framing front edge.
The straight edges of the seam are neatened with double hems, 1.5mm wide, which had been turned to the underside and hemmed from left to right, before the seam was closed. Where the seam was curved and on the bias (and now open) the turnings are cut roughly , unfinished at the edges, and of uneven width.
The seam had been closed with neat, fine oversewing, worked on the outside of the cap with finely-spun silk thread. The stitching appears to have been started at the point of the dart, and continued to the lower edge, where the right-hand side is 1cm longer than the left. On the inside, needle holes and impressions of stitches show that the dart had been pressed towards the right-hands side, and hemmed flat, along the fold.
The cap is cut with a selvedge edge [framing] the face. This and the two ends of the rectangle which for the lower edge of the cap had been neatened with exceptionally fine roll hems. The remains of two groups of stitches, close to the front edge, at each side of the cap, from which sharp creases radiate, probably indicate the former position for ties for fastening the cap closely around the head. Thread Count 66 end per inch warp, 51 picks per inch weft. Two prominent holes at the back were probably caused by friction during normal use."
He was also kind enough to include another image of the cap:
 |
| Courtesy of the Museum of York |
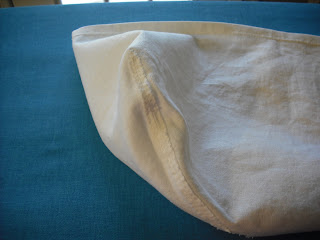
At the time, I couldn't quite afford undyed silk, so I used some white linen left over from another project. I pulled back out my hand-sewing reference and tried to come as close as possible to the measurements as I could. I don't remember where the straps came from - I was either inspired by another reconstruction or by my inability to keep hats on. It was probably a combination!*
 |
| Whole cap, open to show hem-stitch and strap attachment. |
 |
| The curved dart, from inside. |
 |
| The curved dart, from outside. |
Overall, there are several changes I'll make before I attempt this again:
- Use the undyed silk the original is constructed from, and make sure to get a large enough piece that I can use the selvedge to frame the face, like the original. The piece of linen I started with was 28" by 10", so in the future I will get a 23" by 8-1/2" piece with selvedge, which factors in the next note:
- Shorten the length to match the proportions of the original - it's a bit long right now, and drags too much on my shoulders. The original only comes about an inch below the glass model's jawline, so my next attempt will be about 2" shorter.
- Leave the strap off!
Altogether this was more of a muslin than a finished piece but I've learned some important things from it that I will use in the future.
*Update: I was re-reading some of my materials, and I remembered where the strap came from: Compleat Anachronist #59: Women's Garb in Northern Europe, 450-1000 C.E. on pg. 48.
*Update: I was re-reading some of my materials, and I remembered where the strap came from: Compleat Anachronist #59: Women's Garb in Northern Europe, 450-1000 C.E. on pg. 48.


